There’s no doubt that COVID-19 set the remote work revolution on a fast track. As explained in our blog “Tech trends for Boston businesses beyond 2020”, organizations are now considering multiple avenues to provide a more seamless remote work experience for their people. Virtualization has become an attractive option recently, especially because it’s lowered in cost and conveniently built-in for Windows users.
As we help companies in the Greater Boston Area with digital transformation, we’ve found virtualization to be one of the easiest and most impactful technologies to launch. Modern endpoints have default settings in their BIOS (Basic Input/Output System) or applications like HyperV that make the deployment of a virtualized machine that much easier.
This blog will help by providing simple steps to enabling virtualization on Windows 10, some security considerations, and ultimately, a knowledge base for organizations considering virtualization.
Enabling Virtualization in Windows 10
One of the best, and often overlooked, features of Windows 10 is the native support for hardware virtualization. Once you enable virtualization via its proprietary client software, Hyper-V, you get a virtual machine that’s completely separate from your main system. This client software can also be used to enable end-user access to a VDI (Virtual Desktop Infrastructure).
Here are the basic steps to enable virtualization on your Windows 10 device, either with Hyper-V or another virtualization software like VMware Workstation Player.
1. Verify BIOS setting has Virtualization enabled
Every PC has a different version of BIOS (Basic Input/Output System) screen and settings, this is unique for every device manufacturer. Normally, BIOS settings can be accessed using the function keys (F1, F2, F3, F10, or F12) during boot. If these don’t work you can always use Google to find the specific key for your device.
Once you access the BIOS make sure to enable Virtualization under “Advanced Settings” or “Advanced Mode”.
If your BIOS doesn’t display “virtualization” you might have to install a BIOS update, you can use the manufacturer app included with your PC or manually search the internet for it.
2. Enable Microsoft Hyper-V
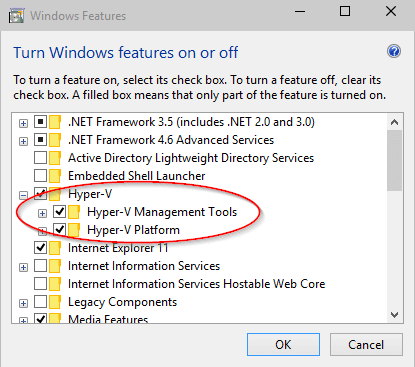
If you choose to use the default Microsoft virtualization software, you need to make sure HyperV is enabled. Follow these steps:
- Press the Windows key to get the Search box
- Type “turn windows features on or off” and click on it to open it
- Scroll down and check the box next to Hyper-V
- Click OK

3. Allow HyperV to download the necessary files to enable Virtualization
This will only take a few minutes. An important thing to note here is that enabling Hyper-V in a Windows 10 device won’t affect your PC performance. If your computer slows down it might be a processor issue. Check the hardware requirements below for more information.
4. Reboot your computer
Once the files are downloaded the system will prompt you to reboot, you’ll need to complete this step to ensure Hyper-V is fully functional.
You are now ready to start building a virtual machine (VM)
If you couldn’t deploy a VM following the steps above it might be a hardware issue. Verify that your device follows these hardware requirements for proper installation of a virtual machine:
- Windows 10 Pro or Enterprise
- 64-bit processor with Second Level Address Translation (SLAT)
- 4GB system RAM at minimum
- BIOS-level Hardware Virtualization support
Or you can contact our team at Casserly Consulting for virtualization support.
Security Considerations for a virtualized environment
As with any other technology, cybersecurity needs to be addressed. The question often asked, is virtualization secure? Short answer, it can be.
In a virtualized environment, operating systems can be isolated from the endpoint itself, which can reduce the risks of data loss if a device gets stolen or lost. It can also be designed to enforce policies for users accessing data or applications.
Although a virtualized environment can reduce endpoint cybersecurity risks, your organization must consider managed detection and response solutions to increase network security.
We often recommend running a cybersecurity vulnerability assessment right after virtualization has been deployed to make sure there are no areas of risk.
Virtualization is an efficient, easy-to-implement technology that companies of any size can take advantage of. And if you feel overwhelmed with anything related to this topic you can contact our team at Casserly Consulting and will be able to help you and advise you on which virtualization environment works best for your business needs.
Note: Resources provided in partnership with Nero Consulting

